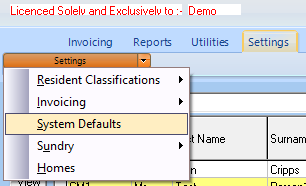
Click on the "Settings" tab to bring up the list of options and then select "System Defaults" from the menu options list.
The "System Defaults" screen will now be displayed.
Some local authorities require the administrator's name and position to be shown on invoices. When these are entered in the relevant boxes they will appear on special local authority invoice layouts.
Select the version of Sage 50 Accounts that you are using from the drop-down list.
Enter the correct number of days in the current year, this allows leap years to be taken into account when calculating client fees.
The delete button on the residents screen can be turned on or off by ticking or unticking the box. The default setting for this option is to not show the delete button, this should only be changed if you want to allow users to delete resident records. This should be done with extreme care, deleting a resident record will remove all invoice records and history for that client.
CareMaster also has an option to show the breakdown of residents fees on invoices, ticking this box allows this function to operate. N.B. This also requires a special invoice layout.
You can also choose a different "Background Screen Colour" from the drop down list at the bottom of the screen. This can be useful for differentiation if you are making use of the
Multiple Databases option.
When you are setting up new resident records three options: enter your own reference manually (it must be unique); "First letter of first name" followed by "First letter of surname" followed by a number - (e.g. John Smith would have the reference "JS001"); sequential number. Select the option you require from the drop-down box.
If you use the program to produce
Direct Debit Output, you may wish to use the Sales Ledger Code as the DD reference. If you wish to do this then tick this box.
There is an option to show the Payment Due Date on invoices, if you wish to use this, tick this box. Please also refer to the Generate Sales Invoices section. You will also need an amended invoice layout to make use of this feature.
On the Residents Main Details screen there is a custom field that can be used for any purpose you wish. This box allows you to specify a description for this field.
There is also the option to save PDF invoices in separate folders for each home (if you have multiple homes). Within the "PDF Invoices" folder you will then see folders for each home.
Finally, there is an option to "Show Quantity and Unit Amount Fields" on charge template lines. When this option is ticked, two additional fields will become available on charge template lines (the program must be closed and restarted before this comes into effect). Go the the Charge Template Charges page to see details of this.
Now click on the "Sage Invoice Posting" tab.
You can post data to Sage Accounts in either "Detailed" or "Summary" format. If you choose the "Summary" option, you must enter your preferred text in the box labelled "the following text". Otherwise, if you choose "Detailed", select your preferred option for the information that will appear in the Sage details field when you post invoices. Generally speaking the "Time-Related" column relates to Fee charges and the "Variable" column relates to other items (see
Invoice Charge Types for more information. The option you select here can be over-ridden if required at the time of
Posting Invoices to Sage.
There are four tick boxes at the bottom of this screen. The first tick box allows the re-posting of invoices to Sage Accounts.
N.B. This should normally be turned off and only used if data has been lost in Sage, otherwise duplicate entries will result. The second tick box allows invoices to be posted to Sage by "Dataset" rather than by home, this also affects the
Charge Templates. Please contact support for guidance before changing this option. The third tick box prefixes the Invoice Number with the home reference code when posting to Sage, if this is selected it is not then necessary to choose this option every time you post invoices.
CareMaster can apportion invoice values across month ends when posting to Sage Accounts. To make use of this facility, tick the fourth box, "Post sales invoices to Sage over multiple accounting periods?" This option will split the total value of the invoice in accordance with the number of days that fall into each month and then make two postings to Sage Accounts. (e.g. a 28 day invoice with a total value of £280.00 is created using a date range of 25th January to 21st February - this will post £70.00 into January and £210.00 into February). N.B. Using this option means that each invoice will produce two separate transactions in Sage Accounts with different dates but using the same invoice number.
If required you can also turn on the warning for this last option by ticking the final box at the bottom of the screen.
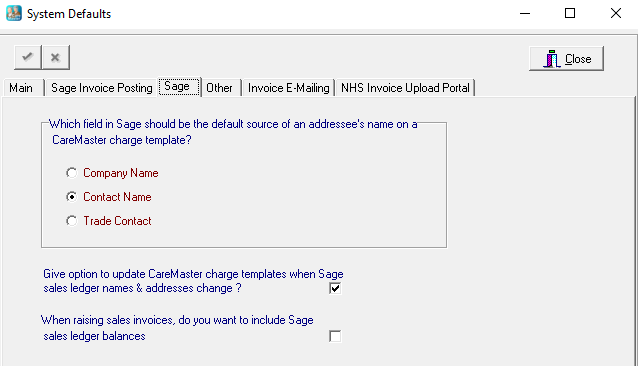
Now click on the "Sage" tab.
When customer accounts are created in Sage 50 Accounts, the usual protocol is to use the resident name as the account name (Company Name in Sage). However, when invoices need to be sent to a family member or other third party the wrong name will appear on the invoice. You can overcome this problem by using one of the other name fields in Sage (Contact Name or Trade Contact) to hold this data. Select the one you wish to use.
If you select the first tick box at the bottom of the screen you will be given a further option after running the
Refresh Sage Data process. If this option is used, any changes you have made to customer names and addresses in Sage 50 Accounts will be updated to the
Charge Templates automatically.
The second tick box allows you to show any previous outstanding balance from Sage on your current invoice.
N.B. To ensure that the outstanding balances shown are up to date it is essential that you run the Refresh Sage Data routine before generating your invoices.
Now click on the "Other" tab.
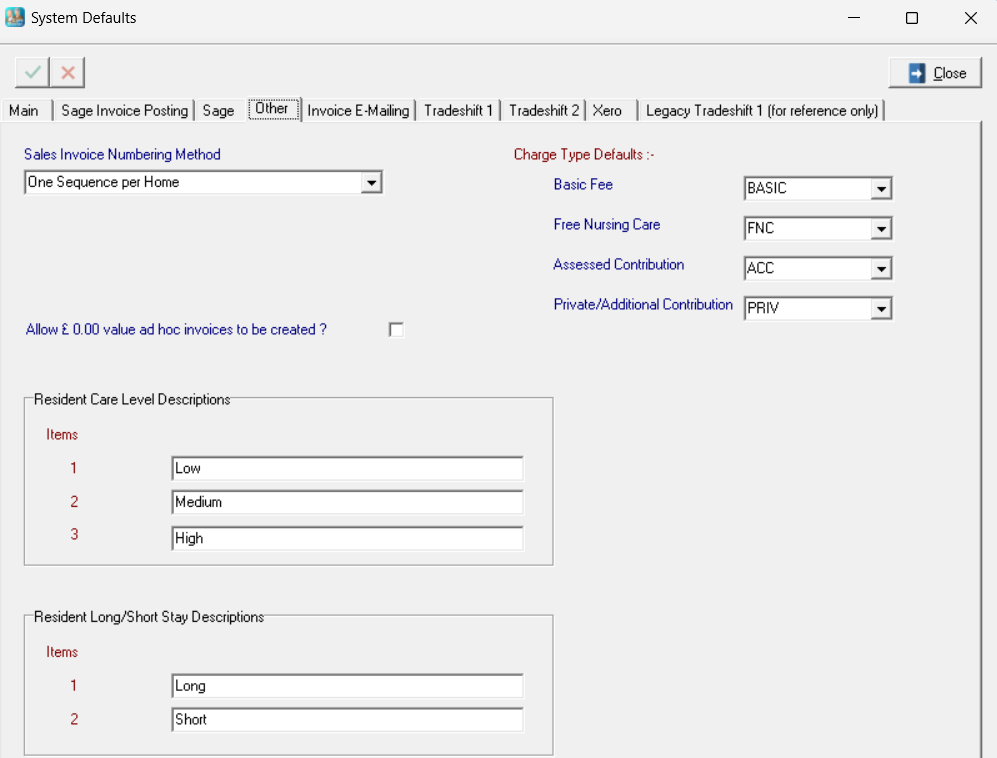
Select your preferred invoice numbering method from the drop-down list. (Some of the methods are only applicable to multi-home installations). "One Sequence per Home" is the default setting. In this case you can enter the starting invoice number and invoice number prefix on the
Homes screen.
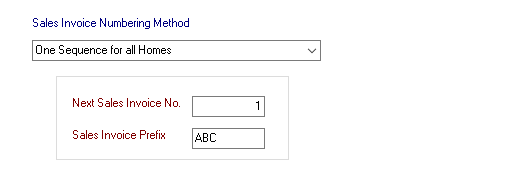
If you select "One Sequence for all Homes", two additional fields will appear to allow you to enter the starting invoice number and invoice number prefix.
The third option is "One Sequence per Sage Dataset".
If this option is selected, you can enter the starting invoice number and invoice number prefix on the
Sage Datasets screen.
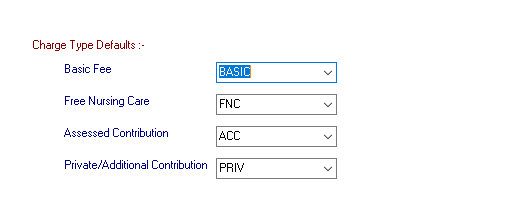
On the right of the screen you can select the charge types you wish to use as defaults for the four main charging areas.
N.B. This can only be done after you have created your Charge Types.
There is also the option of allowing the creation of £0.00 (zero) value ad-hoc invoices. If you need to do this, this option must be ticked.
In the lower part of the screen you can define the field names for "Resident Care Levels" and "Long/Short Stay". The defaults for the Care Levels are "Low, Medium and High" and these can be overtyped if you wish to change them. The defaults for Stays are "Long or Short", these can also be changed by overtyping (e.g. "Permanent" and "Respite"). These two areas affect the fields which are on the "Main Details" page of the Resident record.
Now click on the "Invoice E-mailing" tab.
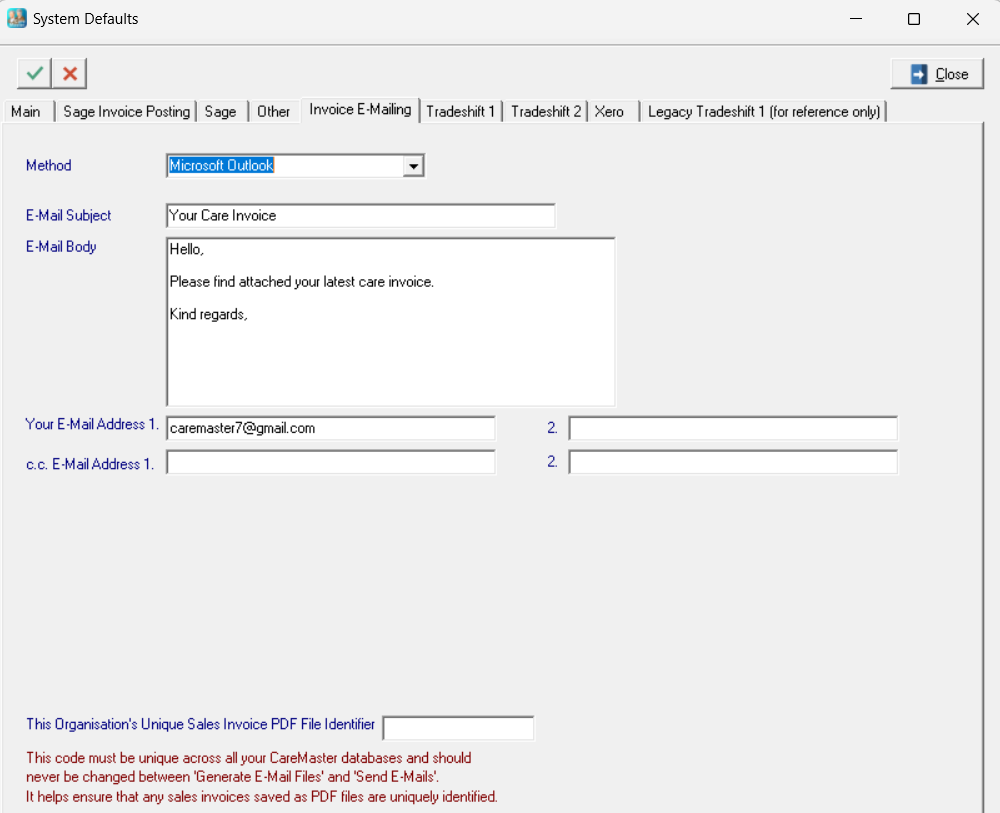
If you want to be able to email invoices directly from CareMaster, this screen must be filled in with the correct data. There are two methods available for emailing invoices, via Microsoft Outlook or SMTP.
If the first option is chosen, enter the following data as shown in the image above: "E-Mail Subject" is the subject line that you want to appear and "E-Mail Body" is the message that you want to send out. "Your E-Mail Address" is the address that you want the messages to be sent from. If you want to receive a copy of any emailed invoices that are sent out then enter an email address in the "cc E-Mail Address" field. You can also include alternatives for these two addresses if you want to have the option of using a different email address.
At the bottom of the screen there is a field for the organisation's identifier. This can be a short code (e.g. "ABC") and if you are using CareMaster with different databases for each home, then each database must have it's own unique code.
N.B. This option is not guaranteed to work with all versions of Microsoft Outlook.
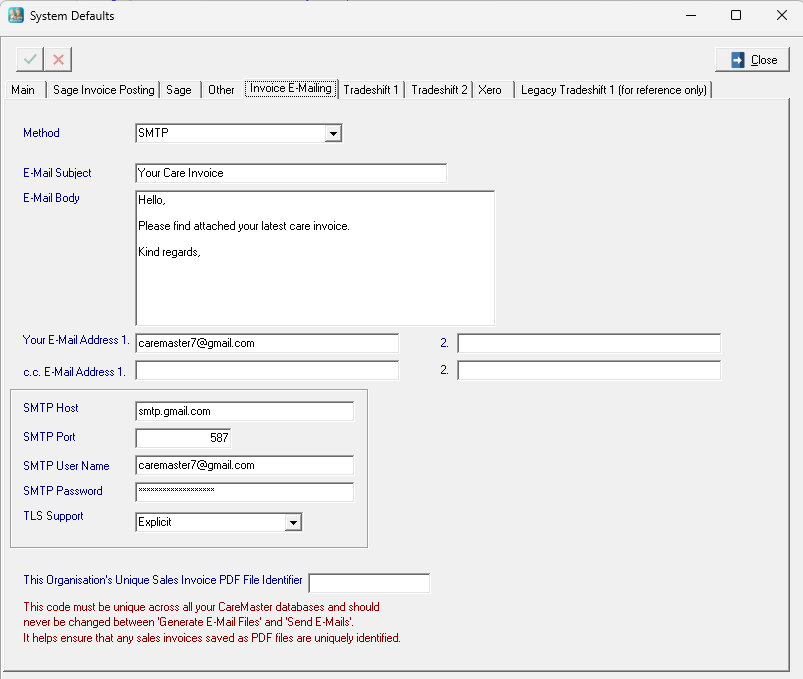
If the second option is chosen, the screen will appear as follows.
Enter the data in the upper part of the screen as explained above. The four boxes in the lower part of the screen are all related to SMTP information and you should consult your IT support to get the correct data to input here. If your email system requires the use of "TLS" you can select the required option from the drop down list at the bottom of the screen. N.B. The SMTP entries shown on this screen are examples only and will not work for your own set up. Also, any invoices emailed from CareMaster will go direct from the program and not from your own email client.
At the bottom of the screen there is a field for the organisation's identifier. This can be a short code (e.g. "ABC") and if you are using CareMaster with different databases for each home, then each database must have it's own unique code.
You will also need to select email addresses on the charge templates for any invoices that you want to email, look at the Charge Templates
Main screen for information on this and also go to Send Invoices by E-mail for information on the process of emailing invoices.
The next tow tabs are related to the use of the "Tradeshift" module which is a chargeable extra, if you want to upload invoices from CareMaster to Tradeshift you will need to set up these next two screens. (See Tradeshift Module). If your current licence does not include the module, please Contact Us to arrange an upgrade.
Now click on the "Tradeshift 1" tab.
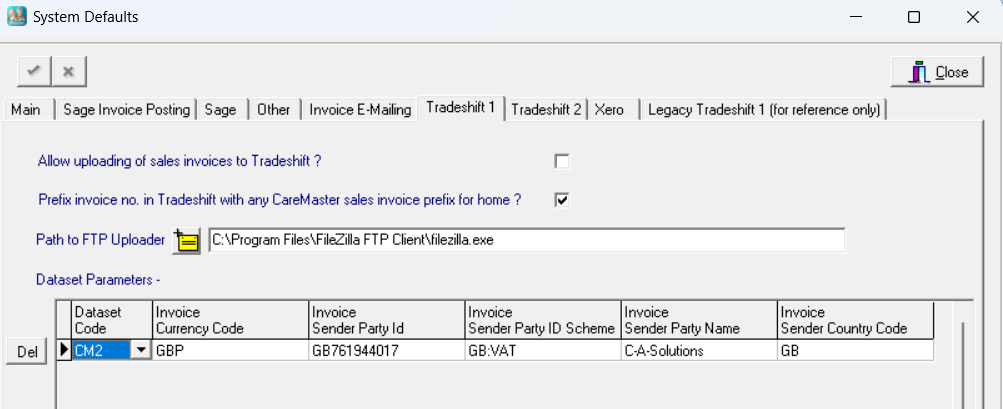
The first box must be ticked to activate the module. If you want the Home Code prefix to be added to the invoice number in Tradeshift, tick the second box. Uploading invoices from CareMaster to Tradeshift requires some FTP software. When this additional software has been installed, enter the path to the executable file in the "Path to FTP Uploader" field.
In the next section you will need to enter your Tradeshift Sender Party information. Enter the Currency Code, Sender Party ID, Sender Party ID Scheme, Sender Part Name and Country Code. If you have more than one Tradeshift account you can enter a line for each account on this screen.
Now click on the "Tradeshift 2" tab.
This screen holds the Tradeshift "Receiver" information. You will need to add a line for each Customer Code that you wish to upload. Click the "Add" button which will give you a blank line and then select the relevant Customer Code from the drop down list. Then select the Dataset Code from the drop down list. Now enter the Receiver ID information in the ID, ID Scheme, Name and County Code fields. Click on the green tick at the top of the screen to save.
If you are using Xero Accounts please go to the
Xero Users section for more information.
