Post Invoices to Sage
This is the final stage in the CareMaster invoicing process.
Click on the "Invoicing" tab to bring up the list of options and then select "Post Sales Invoices to Sage Line 50" from the menu options list.

The "Sage Sales Invoice Export Routine" screen will now appear.

For normal use we recommend the "Detailed" export format. There are several options for the data that will appear on the Sage audit trail as follows:
-
Details on Invoice Line - The data that appears on the CareMaster invoice will appear in Sage in the same format.
-
Surname and Invoice Period - This will display the Resident surname and the period that has been invoiced for.
-
the follwoing text: - this allows you to enter a line of text which will appear on all transactions posted to Sage. This is only used in conjunction with the "Summary" posting option. (See System Defaults "Sage Invoice Posting" tab.)
-
The word 'CareMaster' - self-explanatory.
-
Sage Customer Code and Invoice Period - This will display the Sage Customer Account code that was selected on the charge template along with the period that has been invoiced for.
-
Sage Customer Code, Resident Ref, Invoice Period and Rate - This will display the Sage Customer Account code that was selected on the charge template, the data entered in the 'Reference No' field on the Main Details screen, the period that has been invoiced for and the weekly rate that has been charged.
-
Resident Name, Order No and Invoice Period - This will display the Resident surname, any 'Order No' that has been entered on the Invoicing screen and the period that has been invoiced for.
-
Sage Customer Code, Resident Surname, Resident First Name, Invoice Period and Rate - This will display the Sage Customer Account code that was selected on the charge template, the Resident's surname and first name, the period that has been invoiced for and the weekly rate that has been charged.
-
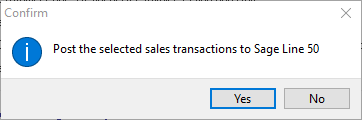
Charge Type Code and Invoice Period - This will display the Charge Type Code that was selected on the Charges tab of the Charge Template and the period that has been invoiced for.If you wish the Invoice Prefix Code that was entered on the Setting up Homes screen to be displayed in Sage, tick the "Prefix Invoice Number in Sage with any invoice prefix for this home?" box. This can be set as the default option in the System Defaults "Sage Invoice Posting" tab.If you have selected the option to "Post sales invoices to Sage over multiple accounting periods" in the System Defaults "Sage Invoice Posting" tab, then this tick box will also appear on the screen. You can disable this option for this posting only, by unticking the box. You can also set the system to display a warning before posting if required, this is turned on from the System Defaults "Sage Invoice Posting" tab.Select the date range for the posting and the Home that you wish to post, or select the Home and the Invoice Number range that you wish to post.N.B. If you have selected the "Include Invoices Already Exported" option from the "Sage Invoice Posting" tab on the System Defaults screen, this will allow invoices which have already been posted to Sage to be re-posted.The should only be used in exceptional circumstances, for example if Sage data has been lost and it is necessary to recreate sales information. If used in other circumstances it could result in the duplication of sales data in Sage 50 Accounts.Click on the "OK" button to proceed. Then click on "Yes" to confirm the process or "No" if you wish to cancel.
 A Sage login is required to complete the posting process. We recommend that an alternative username is used when posting from CareMaster. e.g. if your usual username is "John" your CareMaster posting username could be "JohnCare".N.B. It is good practice to back up your Sage data and log out of Sage Accounts before attempting to post invoices from CareMaster.
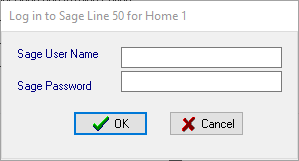 Enter your Sage username and password and then click on "OK" to continue.A dialog box will be displayed to confirm the number of invoice lines posted.
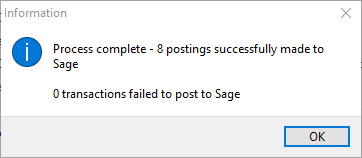 If a transaction fails to post an error message will be displayed giving the number of the invoice so that it can be checked and amended. (This is usually caused by the failure to use a valid Sage Customer Code or Nominal Code).N.B. This problem can be avoided by running the Validate Charge Templates report or the Check Data process before generating invoices and correcting any anomalies found.