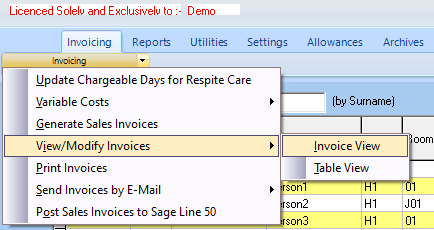
Click on the "Invoicing" tab to bring up the list of options and then select "View/Modify Invoices" followed by "Invoice View".
The following screen will appear showing the earliest invoice created.
The required invoice can be found by either scrolling through the invoices using the "Next" button (see
Navigation Bar for details), or by using one of the "Search" facilities. If you know the number of the invoice you require, you can use the "Quick Search" option. Enter the number in the "Search for invoice" field and then click on the "Pointer" button to the right of the field.
You can cancel the search by clicking on the button with the black cross.
Alternatively, you can open the comprehensive "Search" facility by clicking on the "Search" button.
This will open the "Search for a Sales Invoice" screen.
There are six different search criteria available: Invoice Date, Home Name, Client Name, Date From, Date To and Invoice Number. Select the required option from the list on the left and then fill in the "Starting Range" and "Ending Range" boxes, then click on "OK" to display the requested invoice.
N.B. You can use more than one search criteria if required - e.g. you may want to search for all invoice for a specific "Client Name" within a date range ("Date From" and "Date To").
The "Main" tab on the invoice screen shows the basic information about the invoice along with tick boxes that indicate whether the invoice is printable, whether it has been printed and whether it has been posted to Sage 50 Accounts. If you are using the Send Invoices by E-mail option you will also see the date and time that the invoice was emailed out. In the top right corner of the screen is a field showing the "Payment Due Date", this is calculated from the "Payment Terms" field on the Invoicing Periods screen. Below this field are two further fields, if you are using the Security facility you will be able to see the Username of the person who created this invoice and the date that it was created.
If you wish to print a copy of this invoice, click on the "Print" button at the top of the screen.
If this is a reprint, remember to click the "Include invoices already printed" option on the "Print Sales Invoices" screen. You can also create PDF copies by ticking the box at the bottom.
If you wish to delete the invoice permanently then click on the "Del" button. N.B. This process is not reversible and will result in a gap in your invoice numbers. It should be used with extreme caution. The use of this button is controlled via the Security settings for each user.
Much of the information shown on the three tabs of the Sales Invoice screen can be amended if required. N.B. Any amendments made will only apply to the current invoice. If permanent changes are required, these should be made on the Charge Templates.
The "Charges" tab shows the financial information for the invoice as defined by the Charge Template.
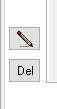
This can be amended as follows: the currently highlighted line can be edited or deleted by clicking on the relevant button on the lower left of the screen.
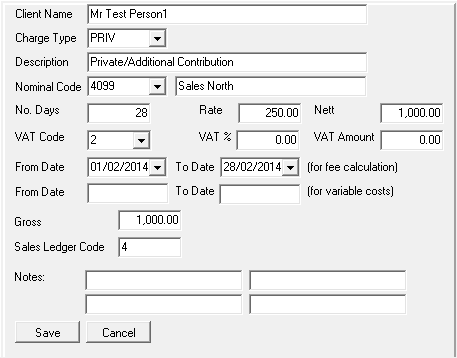
The upper button is the "Edit" button. Clicking on it will open the following screen.
Make amendments in the various fields as required and then click on "Save" to save your changes and update the invoice or click "Cancel" to ignore any changes. This must also be confirmed by clicking on the "Tick" when you return to the "Charges" screen.
To delete a highlighted line, click on the lower "Del" button.
The "Misc" tab holds further information on the client and the invoice as shown in the image below.